Want to see the most common homeowner concerns about going solar and how to address them? Get our 2025 Homeowner Guide to Going Solar.
As you likely know, solar cells produce direct current (DC) electricity, which is then converted to alternating current (AC) electricity by a solar power inverter. Converting energy from DC to AC allows you to deliver it to the grid or use it to power buildings, both of which operate with AC electricity. When designing a solar installation, and selecting the inverter, we must consider how much DC power will be produced by the solar array and how much AC power the inverter is able to output (its power rating).
This article will discuss some critical considerations for solar projects to ensure that the inverters in your designs are appropriately sized.
Specifically, we’ll examine the relationship between the amount of energy your solar array produces and the amount of power your inverter can output, and we’ll introduce the concept of inverter clipping.
Are your customers asking other questions about solar basics? Answer them all by sending them our Solar for Homeowners follow-up kit.
Understanding the inverter DC-to-AC ratio
The DC-to-AC ratio — also known as Inverter Loading Ratio (ILR) — is defined as the ratio of installed DC capacity to the inverter’s AC power rating. It often makes sense to oversize a solar array, such that the DC-to-AC ratio is greater than 1. This allows for a greater energy harvest when production is below the inverter’s rating, which it typically is for most of the day.
The following illustration shows what happens when the power inverter’s DC/AC ratio is not large enough to process the higher power output of mid-day.
The power lost due to a limiting inverter AC output rating is called inverter clipping (also known as power limiting).
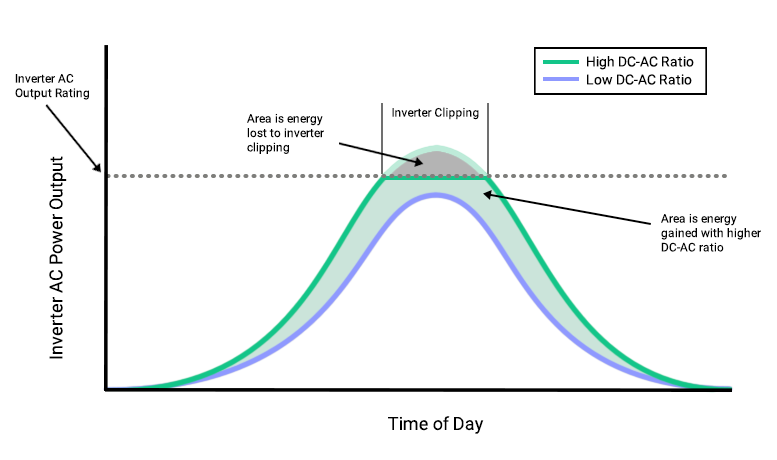 Figure 1: Inverter AC output over the course of a day for a system with a low DC-to-AC ratio (purple curve) and high DC-to-AC ratio (green curve). The chart represents an idealized case; in practice, power output varies considerably based on weather conditions.
How to prevent inverter clipping
While oversizing the solar array relative to the inverter’s rating can help your system capture more energy throughout the day, this approach is not without costs.
“Either spend money on an additional inverter or lose energy harvest to inverter clipping.”
What Figure 1 also shows is an effect called inverter clipping, sometimes referred to as power limiting. When the DC maximum power point (MPP) of the solar array — or the point at which the solar array is generating the most amount of energy — is greater than the inverter’s power rating, the “extra” power generated by the array is “clipped” by the inverter to ensure it’s operating within its capabilities.
The inverter effectively prevents the system from reaching its MPP, capping the power at the inverter’s nameplate power rating.
To prevent this, it’s crucial to model inverter clipping to design a system with a DC-to-AC ratio greater than 1, especially in regions that frequently see an irradiance larger than the standard test conditions (STC) irradiance of 1000 W/m2 (higher levels of irradiance lead to higher power output).
The US Energy and Information Administration (EIA) states, “for individual systems, inverter loading ratios are usually between 1.13 and 1.30.”
For example, consider a south-facing, 20°-tilt ground mount system in North Carolina (35.37° latitude) with a 100 kW central inverter. If we design the system with a DC-to-AC ratio of 1, it will never clip; however, we will also not fully utilize the AC capacity of the inverter. We have two options. Either spend money on an additional inverter or lose energy harvest to inverter clipping.
Knowing how much energy is clipped allows a designer to understand how effective the oversizing scheme is at increasing energy harvest, and ultimately determine what system configuration is the most cost-effective.
The chart below shows three DC-to-AC ratios and their estimated losses to clipping.
| DC-to-AC Ratio | Annual AC Energy Production | Energy Lost to Clipping |
|---|---|---|
| 1.0 | 163.06 MWh | 0.0 MWh |
| 1.3 | 193.86 MWh | 1.8 MWh (0.9%) |
| 1.5 | 217.24 MWh | 11.0 MWh (4.8%) |
Table 1: Annual energy production out of a 100 kW inverter as a function of DC-to-AC ratio. As the DC-to-AC ratio increases, so does the AC output and clipped energy.
Aurora’s solar design and sales software automatically takes inverter clipping into account in its performance simulations. Our system loss diagram automatically calculates the amount of energy that is clipped throughout the year and the percentage of total energy that amount represents. Aurora’s NEC validation report ensures designs are code-compliant and appropriately sized so installers can be confident in their work.
Types of solar inverters
Microinverters
A microinverter is a device that converts the DC output of solar modules into AC that can be used by the home. As the name suggests, they are smaller than the typical solar power inverter, coming in at about the size of a WiFi router. Microinverters are usually placed under each solar panel, in a ratio of one microinverter for every 1-4 panels.
Advantages of using microverters include:
- Higher yield: The output of string inverters is capped by the least-efficient panel in the string. In contrast, microinverters use a parallel circuit, so they aren’t limited to the least-producing panel.
- More accurate monitoring: Since microinverters are paired to individual or grouped solar panels, users have granular access to production monitoring per panel instead of the whole system.
- Easier expansion: Scaling up a PV system is as easy as adding one microinverter for every 1-4 new panels added to the system.
- Rapid shutdown: Microinverters can be rapidly turned off, which is an important requirement in new electrical codes in case of accident or urgent servicing situations.
- Longer lifespan: Microinverters can have up to 25-year warranties vs. 8-12 years for standard inverters.
On the other hand, cons include:
- Higher acquisition cost: On average, microinverters can be over $1,000 more expensive than string inverters for a typical 5kW residential installation.
- More challenging to service or replace: Fixing or replacing a failed microinverter is more difficult, since you would need to go up to the roof, work the rack, and unbolt the panel to access the unit.
To sum it up, microinverters are best used in sites where the panels face multiple orientations, have shading issues (so that the least efficient panel doesn’t affect the whole system output), have a good chance of being scaled up in the future, and if the local electrical code requires a rapid shutdown capability.
To learn more about module-level power electronics, check out our article Module-Level Power Electronics (MLPE) for Solar Design: A Primer.
Central (or string) inverters
A central inverter, commonly referred to as a string inverter, is a device that converts the DC output of a string of solar panels into AC for home or commercial use. These inverters are typically larger and are installed at a central location, often near the home’s main electrical panel or on an external wall.
Advantages of using central inverters include:
- Cost Efficiency: String inverters are generally less expensive on a per-watt basis compared to microinverters, making them more cost-effective for larger installations.
- Established Technology: Having been around longer than microinverters, central inverters have a proven track record and are trusted by many installers.
- Less Hardware: With only one inverter needed for multiple panels, there’s less equipment to install and maintain on the roof.
- Easy Maintenance: Since they are usually installed in accessible locations, central inverters can be easier to service or replace than multiple rooftop microinverters.
- Performance in Ideal Conditions: In scenarios where there’s no shading and all panels have a consistent orientation and tilt, string inverters can perform exceptionally well.
On the other hand, cons include:
- Shading Impact: If one panel in a string underperforms due to shading or debris, the output of the entire string can be affected.
- Limited Monitoring: String inverters do not offer granular, panel-level monitoring. If there’s an issue, it can be harder to determine which specific panel is underperforming.
- Shorter Lifespan: Central inverters often have a shorter lifespan than microinverters, typically needing replacement after 10-15 years.
- Less Flexibility: If you want to expand the system later, it may require a larger inverter or additional inverters, especially if the original inverter is operating near its capacity.
- Potential Single Point of Failure: If the central inverter fails, the entire solar system stops producing electricity, whereas systems with microinverters or power optimizers might only see reduced performance.
Power optimizers
Power optimizers are devices that are attached to each solar panel, similar to microinverters. However, instead of converting the DC output to AC, they “condition” the DC electricity by adjusting the voltage and current. This optimized DC power is then sent to a centralized inverter for conversion to AC.
Advantages of using power optimizers include:
- Improved Efficiency: By optimizing the DC power at the panel level, power optimizers can counteract inefficiencies from shading, dirt, or panel mismatch.
- Flexible Installation: Like microinverters, power optimizers allow for panels to be placed in various orientations and tilts without compromising the entire system’s efficiency.
- Granular Monitoring: With individual optimizers on each panel, users can monitor the performance of each panel separately, identifying potential issues early on.
- Safe DC Voltage: Power optimizers can reduce the DC voltage to a safe level during installation, maintenance, or emergencies, ensuring safety.
- Combination Benefits: Power optimizers combine the advantages of both central inverters and microinverters, providing efficient performance with a centralized conversion system.
On the other hand, cons include:
- Added Cost: Introducing power optimizers increases the system’s overall cost, as you’re essentially adding another component to each panel.
- Complexity: The addition of power optimizers adds complexity to the system’s installation and wiring, potentially leading to longer installation times or more potential points of failure.
- Maintenance Challenges: If a power optimizer fails, it may require a technician to access the roof or the panel’s location, which might be more challenging than servicing a centralized inverter.
- Efficiency Concerns: While power optimizers boost panel efficiency, they themselves consume some power to operate, which can slightly reduce the overall system efficiency.
- Dependence on Central Inverter: Even with power optimizers, the system still relies on a central inverter to convert DC to AC. If the inverter fails, the entire system is affected, similar to a system without optimizers.
The verdict on solar inverter sizing
- Oversizing a solar array relative to a solar power inverter’s rating (DC-to-AC ratio greater than one) allows for increased energy harvest throughout most of the day, especially in the morning and late afternoon.
- When a DC array produces more energy than the inverter is rated to handle, the inverter clips the excess power and caps its output at its rated power (an effect known as inverter clipping).
- An alternate approach to increase energy production while avoiding inverter clipping would be to include another inverter. When deciding what approach to take, designers must consider the trade-off between the cost of purchasing and installing an additional inverter compared to the value of the energy that will be lost due to inverter clipping if they oversize the solar array.
- When estimating the energy production of a solar project design, it’s important that your performance simulations take inverter clipping into account (as Aurora does automatically), in order to ensure production results accurately reflect the system size of the design.
Have specific questions that we’re answered here? Schedule a quick chat with our team.
Want to get started with Aurora without talking to anyone? Sign up here.
Solar inverter FAQs
What is a solar power inverter?
A solar power inverter is an essential element of a photovoltaic system that makes electricity produced by solar panels usable in the home. It is responsible for converting the direct current (DC) output produced by solar panels into alternating current (AC) that can be used by household appliances and can be fed back into the electrical grid.
What does a solar power inverter do?
A solar power inverter converts direct current (DC) output into alternating current (AC) for use in standard electronics, appliances, and more.
How does a solar power inverter work?
Solar panels produce electricity in direct current (DC). Direct current is basically electricity flowing in one direction. The problem is, homes and businesses run on alternating current (AC), which is electricity reversing directions many times per second. A solar power inverter runs direct current through two or more resistors that switch off and on many times per second to feed a two-sided transformer, creating alternating current usable in homes.
How long does a solar inverter last?
A solar power inverter typically lasts 10-15 years, so you’ll probably have to replace it some time during the life of a solar system.
What is a good DC-to-AC ratio?
A 1:0.8 ratio (or 1.25 ratio) is the sweet spot for minimizing potential losses and improving efficiency. DC/AC ratio refers to the output capacity of a PV system compared to the processing capacity of an inverter. It’s logical to assume a 9 kWh PV system should be paired with a 9 kWh inverter (a 1:1 ratio, or 1 ratio). But that’s not the case. Most PV systems don’t regularly produce at their nameplate capacity, so choosing an inverter that’s around 80 percent lower capacity than the PV system’s nameplate output is ideal.
Note: This blog was originally published in 2018. It was updated in January, 2024 to reflect the most recent information. If you have any questions, please contact us.