Table of Contents
Getting Certified to Install Solar Panels
Solar Panel Site Evaluation
Solar Panel Logistics & Paperwork
Solar Panel Equipment Selection
Solar Panel Installation
Final Inspection
Learn more about the fundamentals of solar by subscribing to our blog.
Solar power in the United States is booming. It has ranked first or second in new U.S. electric capacity each year since 2013, and US-installed capacity is quickly approaching 150 gigawatts (GW). The demand for solar installers has grown along with it. Solar installation is now among the fastest-growing professions in the United States, projected to enjoy a 52% growth rate between 2019-2029 — offering a promising prospect for contractors looking to expand their business into this exciting sector.
But you can’t just go out and buy a panel, bolt it to the roof, and hotwire it to a fuse box. It requires quite a bit of planning, a wealth of permits, and extremely careful execution to flip the switch on a new solar panel installation and a fulfilling career as a solar installer.
Getting certified to install solar panels
Installing solar panels is nothing to fool around with: You’re dealing with high-voltage electricity, structural integrity, legal acrobatics, inspections, and your own reputation as an installer. Getting any of these aspects wrong could, at best, result in a bad review, and, at worst, cause harm to persons or property. Crossing your T’s and dotting your I’s is essential to ensuring safe, quality installations.
Before even thinking about installing solar panels, you should get certified. Certification isn’t mandatory for installers, but the myriad benefits are well worth the investment. Solar certification provides valuable training and knowledge that you’ll need in planning and on the job. It’s also an important way to promote customer confidence and can allow you to charge a premium for your services. In addition, it may enable you to operate in more than one municipality or state, increasing your competitiveness.
The North American Board of Certified Energy Practitioners (NABCEP) is widely recognized in the industry and offers an array of certifications. If you’d like to learn more about becoming NABCEP certified, you can read this post about how Aurora Solar employees became certified in as little as two months!
Solar panel site evaluation
You’re certified, you’ve built your brand, and have landed your first prospective client. It’s time to take the first step towards your first solar install.
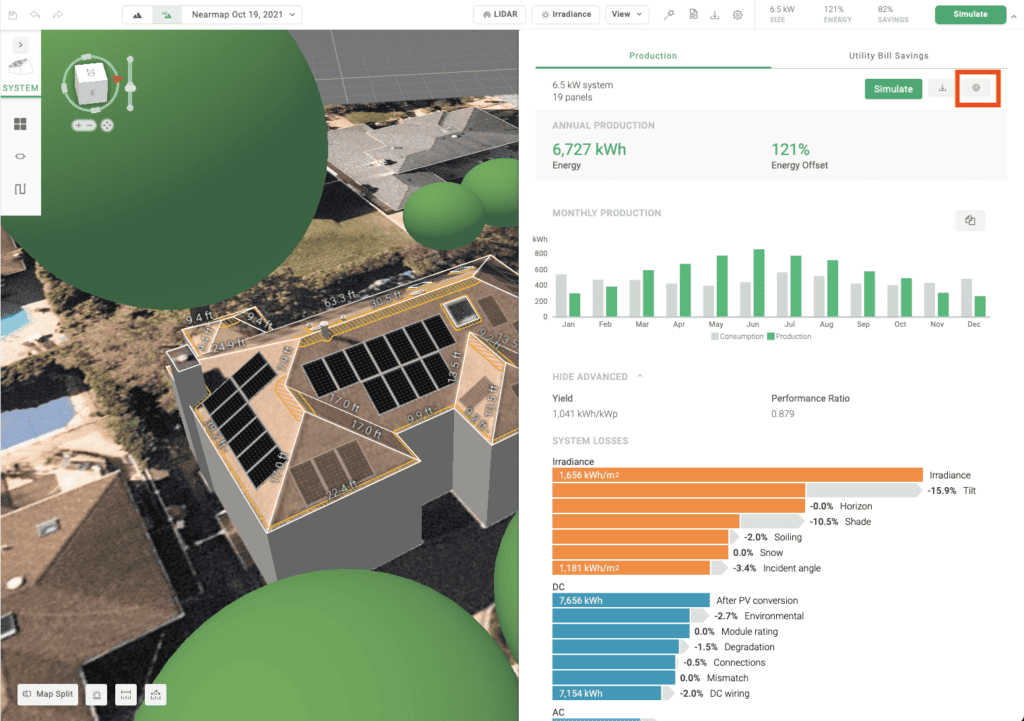
For a successful solar installation, the site needs to be evaluated to ensure the best panel placement, taking into account shade, sun angle, weather, and more. Thankfully, planning a solar installation is easier than ever thanks to Aurora Solar’s remote planning software.
Step 1: installation company evaluation
In a bygone era, solar installers had to conduct on-site visits to evaluate solar output potential. Those days are fading fast. Aurora’s solar design software estimates a proposed location’s potential solar output and generates complete solar designs and sales proposals with just an address and an electric bill.
Simplify your solar projects with Aurora Solar’s solar design software. Schedule a public demo with our sales team today!
Step 2: engineering evaluation
Once a contract is signed, the installer will have to put boots on the ground to ensure the site is ready to go solar. Until recently, an engineer had to conduct a second site visit to evaluate site compatibility. Nowadays, most projects only require one visit after remote evaluation is complete. In this visit, the installer will inspect roof integrity and the electrical configuration of the home to make sure the 3D renderings from Step 1 will actually work on the real site.
Solar panel logistics & paperwork
There’s no way around it, solar panel installation does require some paperwork, and many customers expect their installers to handle pencil-pushing for them. Several intuitive apps can help navigate the process, making permitting, bill of materials, and installation easier.
Here’s some of the paperwork you should expect:
Permits
Solar panels are treated like any other improvement to a home or business and thus require local building permits. It used to be up to you, the installer, to identify the Authority-Having Jurisdiction (AHJ) for each project — but Aurora can now help with our automatic AHJ identification and database. You also need to know the various permitting requirements and ensure your project meets them. The permit process will include:
- Permit from local building department(s), which typically includes a site plan outlining panel location, mounting configuration, wiring diagrams, grid connection details, and other factors.
- Paperwork filed to local utilities, usually including a “net metering” agreement, a contract outlining the terms of electric rates after installation, and compensation for surplus energy sold back to the utility.
A quick word on change orders. Simply put, a change order is a document recording a change to an original construction contract. A permit may require changes to your original plan, and those changes will be reflected in the final project cost. Nearly half of solar installers reported change orders impacted 10-30% of their projects, and about seven percent see change orders affect over half their projects.
Reducing change orders allows the installer to give accurate quotes and stick to them, avoiding unforeseen expenses and legal hurdles later on. Aurora Solar offers permit-ready designs for installers, helping you avoid change orders and deliver the most efficient system possible.
Funding and incentives
Going solar has never been more affordable. New installations pay for themselves in as little as five years, and produce free and clean energy for two decades or more. Plenty of incentives exist making solar even more affordable, and good installers know what they are and how to secure them for their clients.
- Federal Solar Incentives. The beloved Federal Solar Investment Tax Credit (ITC) got a long-term extension and a return to greater benefits with the passage of the Inflation Reduction Act. Residential solar installations and battery storage get a 30% tax credit until step down begins in 2033, with commercial solar and storage enjoying a 30% credit until 2025.
- State Solar Incentives. State solar incentives can be claimed in addition to the Federal ITC. Like the ITC, state incentives are generally calculated as a percentage of the system’s cost. Most states require minimum costs to apply, and credit amounts vary greatly by state.
- Local Solar Incentives. Many local and state governments offer other financial incentives for solar. Property-Assessed Clean Energy programs, or PACE, represent money set aside by participating local and state governments and made available to PACE lenders, who then issue funds to homeowners or businesses looking to make renewable energy improvements.
- Rebates. Many state and local governments, utility companies, and solar suppliers offer cash rebates to encourage solar energy. Rebates can offset the cost of new installations by 10-20%, and vary by region and supplier.
- Solar Renewable Energy Certificates (SRECs). SRECs put a dollar-value on non-power aspects of solar electricity generation, such as environmental and social co-benefits. Enrolled producers earn SRECs per megawatt of clean energy produced, and can sell their credits to help offset solar installation costs. Use this tool to find SREC programs to help your customers make the most of their investment in solar energy.
- Other Clean Energy Financing. Other financial incentives exist on a community and organizational level to help offset solar installation costs. Types, eligibility, and locations vary greatly. Use the DSIRE database to explore various state and federal credits, rebates, SRECs, and other incentives rewarding homeowners and businesses for going solar.
Solar panel equipment selection
With the pencil-pushing done, it’s time to get back to the fun stuff. Once you’ve secured all the paperwork and ensured your customer is getting all the financial incentives available, it’s time to start shopping for the right equipment.
Aurora Solar offers a vetted database of solar panels and components to suit your project’s needs, as well as automated planning software to help you “string” your panels for maximum efficiency.
Solar panel installation
It’s all led up to this moment: Time to get those panels up and running! With the planning and logistics in place, permits secured, and equipment delivered, you’re ready to install. The process will now be relatively straightforward. First up is constructing the platform.
- Roof or grounds prep. You’ll start by making sure the surface where the panels will be mounted is ready.
- Solar panel mounting platform and conduit. Next, you’ll build a platform to mount the panels and run wiring conduit through the ground and/or buildings. You may need to install mounting hardware for batteries and inverters, which should be done along with the panel mounts and platforms.
- Mounting the panels. Angle brackets will be used at the panels’ mounting points, starting with the front brackets first. Before tightening, make sure the panel is even.
- Wiring. Next, panels will be strung together and joined at a junction or fuse box. From there, inverters are installed on the panels, and the wiring is fed through conduits and into internal control modules, then into the home. Other components, such as batteries or power meters, may also be installed depending on your client’s needs. If you’re not a certified electrician, it’s strongly recommended that you subcontract any electrical work out to a professional. Always take extreme caution when working with potentially live electrical components. Solar energy is cool, but not when you’re on the business end of a hot wire.
- Grounding. Properly grounded panels ensure the whole system isn’t fried in the case of a power surge.
Because installation can move quickly, it’s essential to have impeccable planning and processes set up before you pull out your toolbox. Aurora’s solar sales and design software ensures the most efficient installation process possible.
Want to learn more about how to get started in the world of solar installation, download our free guide, PV Education 101: A Guide for Solar Installation Professionals.
Solar panel final inspection
Before flipping the switch, you’ll need a final inspection and approval. A local planning official will double-check your work before giving the municipal greenlight. If the system is grid-tied, the local utility will conduct its own inspection. If no issues are found, the system is ready to go live.
Want to learn more? Schedule a personalized, no-pressure demo to get all your specific questions answered.
FAQs
Is the solar panel business profitable?
The solar business is good business, especially for small contractors installing residential solar. Solar installers are among the fastest growing occupations in the US with a median annual income of $47,670. In fact, jobs in the solar energy solutions industry are expected to grow by nearly 30 percent by 2030, signaling a stable employment sector.
What are the steps to installing solar panels?
Installing a solar panel system has a number of steps, including:
- Site evaluation
- System design
- Permitting
- Ordering equipment
- Installation
- Inspection
- Utility connection
What do you need to know before installing solar panels?
Each state and even separate municipalities have their own requirements for solar panel installation technicians. Generally, a solar installer must meet the following requirements:
- High school diploma (not always required)
- On-the-job training or apprenticeship up to one year
- Contractors license in some states
- Certification in some states
What are the next steps after installing solar panels?
After a solar system is installed, there are a few more steps before it can go on line:
- City or county inspection
- Utility installation of bi-directional meter
- System activation
- System demo