When you mention shading in the context of a solar installation, most people think of big trees casting shadows down on a homeowner’s panels. While this is, of course, a major aspect of shading, it’s not the only thing installers have to consider. Things like hills and mountains that affect the house’s horizon can also affect a site’s solar profile significantly and must be accounted for.
This brings us to the next feature in our series on the Top 10 Things You Didn’t Know Aurora Can Do…
 Feature #9: Horizon Shading

Chances are, when you design a system, you’re mapping all the trees and other obstructions around the house that affect irradiance. But, are you taking that next step and factoring in nearby hills and mountains?
Why Horizon Shading is Important
Just like nearby trees and other obstructions, the shade losses from hills and mountains can sap (pun intended) a system’s energy production. What’s more, the shade losses from these horizon effects tend to occur during the “edges” of the day — early morning and late afternoon and evening.
This timing is important for a couple reasons: Evening is generally a peak time for those with time-of-use rates, and morning and evening also happen to be the times of day homeowners tend to check their system’s performance.
So, there’s not only very real performance loss, but it’s performance loss that’s especially likely to set off alarm bells with customers.
How Aurora’s Horizon Shading Helps
Many solar modeling solutions assume that a project site is surrounded by a flat landscape. To get an accurate measure of horizon shading, then, requires an extra trip to the site to take readings — i.e. pictures. There are tools that help you do this and then output a Horizon File that can be uploaded into design software programs, including HelioScope.
Other options include resorting to creating polygonal structures around a site to model the terrain. Again, this requires an additional site visit to document horizon obstructions, and added design work.
Aurora automates this process. No extra site visits, no uploading files from one system to another, no attempting to draw structures like you’re designing a 1980s video game.
How Horizon Shading Works
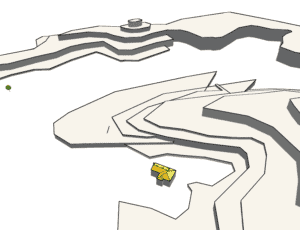
When you generate an irradiance map or run a performance simulation in Aurora, the system collects over 1 million elevation measurements from the nearby area to create a profile of the surrounding terrain. The resulting 360-degree elevation map is called a horizon profile.
You’ll still want to model nearby objects using LIDAR or Designer, of course, to capture partial-shading and mismatch calculations.
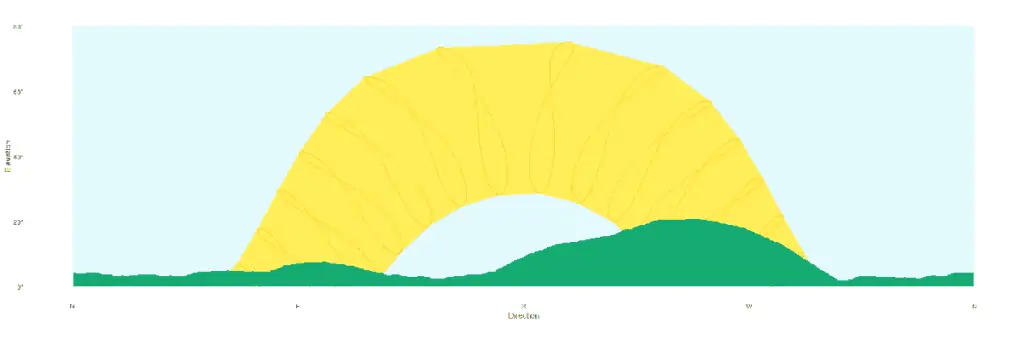
Then, when Aurora is calculating irradiance, it makes a couple of adjustments:
- If the sun is below the horizon profile, the beam component of irradiance is blocked.
- At all hours, the amount of diffuse light is reduced because some of it is blocked by the horizon.
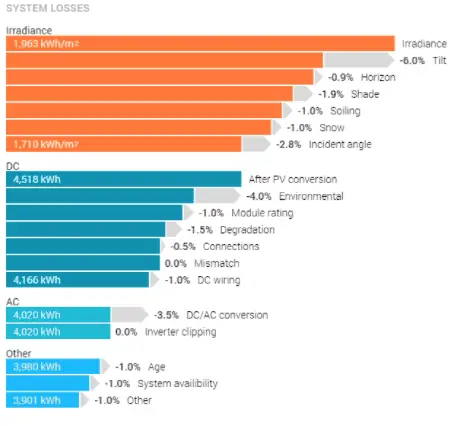
The potential loss from horizon shading is then accounted for and shown in the system losses diagram.
So, instead of added truck rolls and design time, in Aurora, horizon shading just… happens. No step-by-step instructions required for this week’s feature. If you’d like to see it in action, click below to sign up for a demo.
We’ll be back next week with #8. In the meantime, check out our Aurora Top 10: All In One Place page to see all the other features highlighted in this series and look at the schedule for the remaining posts.
Do you have suggestions for an issue or feature you’d like to see covered? We’ll have some Aurora gifts for any ideas we use. Email us here.