 When you’re making a big decision, an important part of the process is getting a second opinion. Whether it’s making a healthcare decision or buying a car, having as much information as possible is key to making an informed choice.
This is especially true when designing a solar installation.
Depending on the simulation engine you use, a solar installation’s estimated output can change by 5-10% — based on things like assumptions on system losses, to the weather data files they use.
So, while one model may show results that are marginal for solar, another might give it a 10% bump, making the install a no-brainer. Likewise, if one model’s estimate seems especially high, another may be 10% lower. In Aurora, you can model using our own simulation engine or PVWatts.
Why Being Able to Compare Aurora and PVWatts is Important
PVWatts is more than just another modeling tool, of course. It is developed by the National Renewable Energy Laboratory (NREL), available for free online, and aimed at homeowners. It’s also the first organic search result in Google for terms like “solar energy calculator”.
All of this means that it’s likely that educated customers will have entered their info into the calculator before meeting with any installer, and a likely objection you’ll hear is, “This estimate doesn’t match up with my research.”
You’d better be ready to address this objection. That’s where Aurora comes in.
How Aurora Helps
By default, Aurora creates performance simulations through Aurora’s simulation engine. But, to get that second opinion, you can easily change your settings to create a simulation using PVWatts.
You don’t have to completely re-do your model, you don’t have to try some hasty calculations on the back of an envelope.
How to Compare Production With PVWatts in Aurora
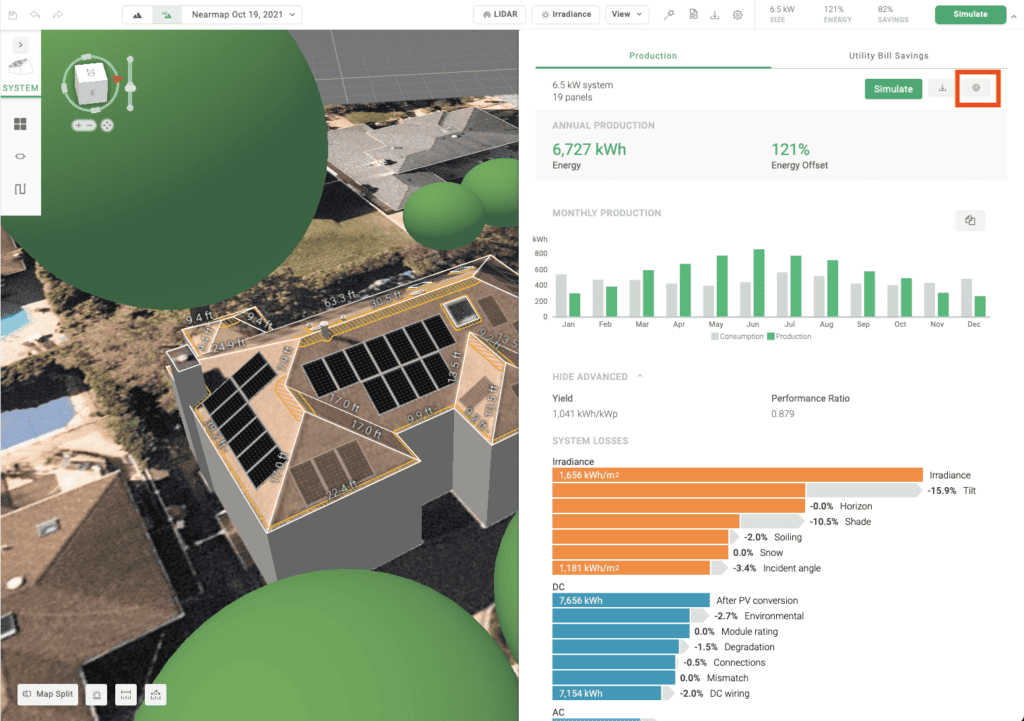
From the main Aurora design, simply click the gear icon in the upper right corner (in the red rectangle in the screenshot below).

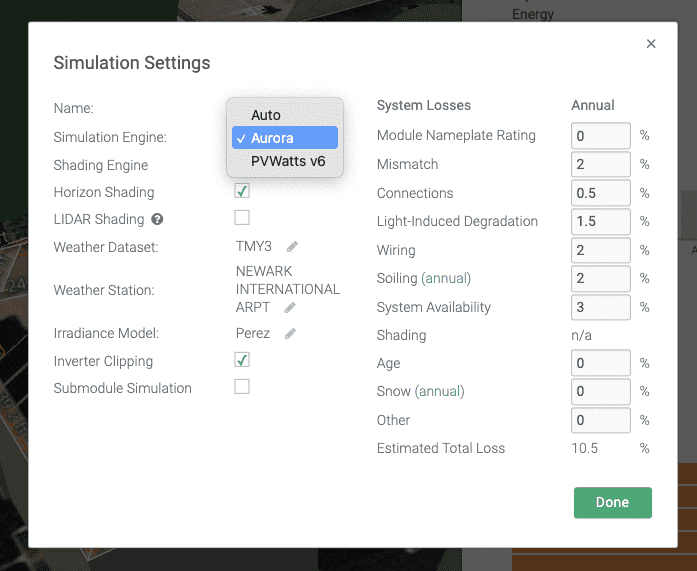
You’ll then be shown a page that lets you select either Aurora or PVWatts as the simulation engine.

Click “Done” and then “Simulate” (in the top right corner of the first screenshot) and you’re done. If you want to go back to the Aurora values, just repeat the process and select “Aurora” from the drop down. Now you’re ready for any production questions that the consumer may have.
(A quick note: You probably noticed the “Auto” option from the simulation dropdown. Auto is simply the default simulation engine. If a user uses modules and inverter[s] it defaults to Aurora’s engine, but if they use only modules it defaults to PVWatts’. You can learn more here.)
Click the links to learn more about Aurora’s simulation engine, and PVWatts.
We hope you’ve had a great start to 2022. We’ll be back next week with feature #2. In the meantime, be sure to check out our dedicated 10 Things You Didn’t Know Aurora Can Do homepage to learn about the other things we’ve featured so far. Then schedule a live demo to learn more about how these features can help you produce more accurate solar designs.
Do you have suggestions for an issue or feature you’d like to see covered? We’ll have some Aurora gifts for any ideas we use. Email us here.
