When it comes to running a solar business, generating leads can be one of the most difficult, and expensive, parts of making a sale. In this blog series we’re looking at ways to generate quality leads from your own website using Aurora’s Lead Capture AI (LCAI). After launching the Lead Capture AI widget from within any website, homeowners can provide information about their home, answer customized qualification questions, instantly review a savings estimate and a 3D model of a solar system on their home, and provide their contact information.
In the first blog of this series, we focused on creating highly effective calls to action (CTAs) that will persuade visitors to launch the LCAI widget on your site. In this post, we’ll discuss the LCAI experience itself and how it can be customized to match your brand, audience, and use case.

Customizing Lead Capture AI is critical because it helps you enhance conversion rates for your audience and gather the qualification information that makes the most sense for your team. You can also easily create multiple versions (or templates) of LCAI and customize each one based on where it will live on your website or which visitors will be likely to click on a particular CTA. As with any lead capture tool, you need to strike a balance between gathering as much information as possible and making the experience short enough to keep the visitor engaged throughout the entire process.
In the sections below, we’ll go over all of the existing LCAI customization options at a high level and discuss what we’ve found to be best practices. For a full tutorial detailing all of the available customizations, you can refer to this article in the Aurora Help Center.
Service regions
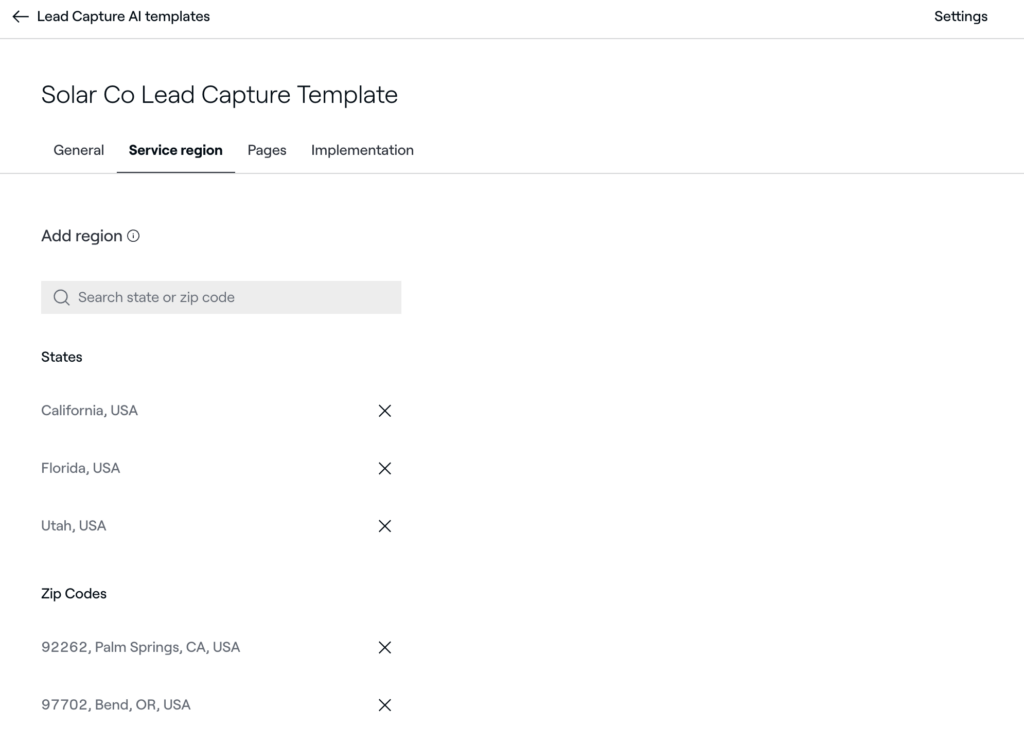
Before you launch LCAI on your website, you may want to define service regions within the LCAI settings. When a potential lead enters their address in LCAI, Aurora will check that address against your service region. Addresses that fall outside your defined regions are automatically disqualified and informed that you don’t serve their area.
By defining all of your service regions, you’ll help your sales team spend less time with addresses that can’t turn into a sale. Additionally, you won’t be charged for leads outside of your service region because they’ll be disqualified before they can enter their contact information. Although visitors outside of your defined service regions will be removed from the LCAI flow, you are still able to redirect them to any page you’d like, such as a generic form where they can share contact information.
Panel placement & savings estimates
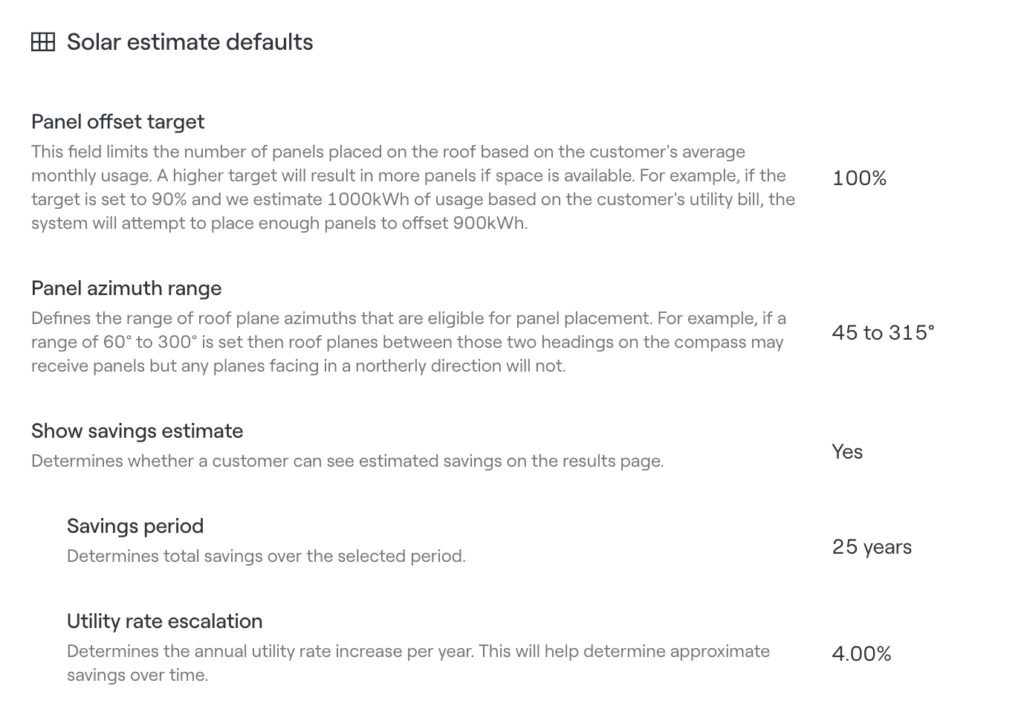
The other group of settings you’ll want to make sure to review prior to launching LCAI is the “Solar estimate defaults,” which define how panels are placed on each roof and how savings numbers are shown to each visitor. Descriptions of each setting can be found in the image below, and best practices we’ve seen for each are as follows:
- Panel offset target: set to between 90% and 110%
- Panel azimuth range: many LCAI users choose to avoid north facing roofs by putting in ranges like 45 – 315o or 60 – 300o
- Show savings estimate: this determines whether a visitor sees a savings estimate (in dollars) along with their 3D model; most LCAI customers leave the default value of “Yes”
- Savings period: this value is often chosen to match the warranty of the solar panels, if one exists
- Utility rate escalation: a standard value to use here is 4% in the US, but you may choose a higher value depending on utility rate trends in your Service Regions
Homeowner insights & disqualifying questions
After setting up your solar estimate defaults and service regions, you are ready to move on to customizing the individual pages within the LCAI experience. Many of the individual pages in Lead Capture AI can be easily configured to use your own brand’s imagery and messaging to optimize conversion rates for your target audience. For each of these pages, the visitor’s response to each question will be available within Aurora along with the lead’s contact information.
The set of pages shown before results are presented can be separated into three categories:
- Required pages
- Pre-built qualification questions
- Custom qualification questions
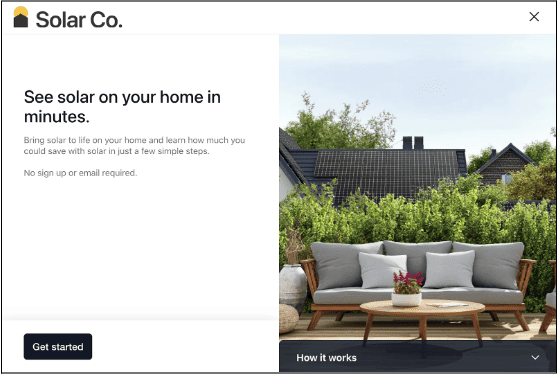
The three pages that are required to be shown prior to LCAI results are the landing page, the address page, and the energy bill page. The address and energy bill pages are both required to generate a 3D model of a home and place panels, which is why they can’t be removed. For the landing page (shown in this blog post’s first image), both the text and imagery can be edited. For the address and energy bill pages, only the imagery can be edited.
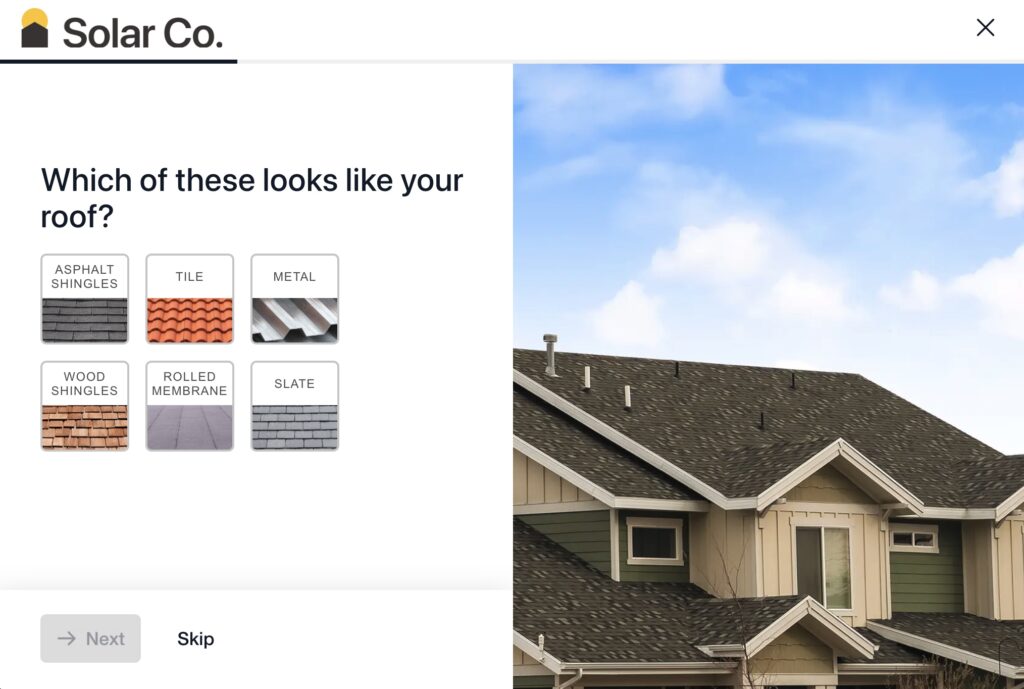
The pre-built qualification questions that are available ask the visitor whether they rent or own their home, what type of home they live in (single family home, townhome, etc.), the age of their roof, and their roof type (shown below). Each of these pages can be hidden from the flow, but they can’t currently be edited.
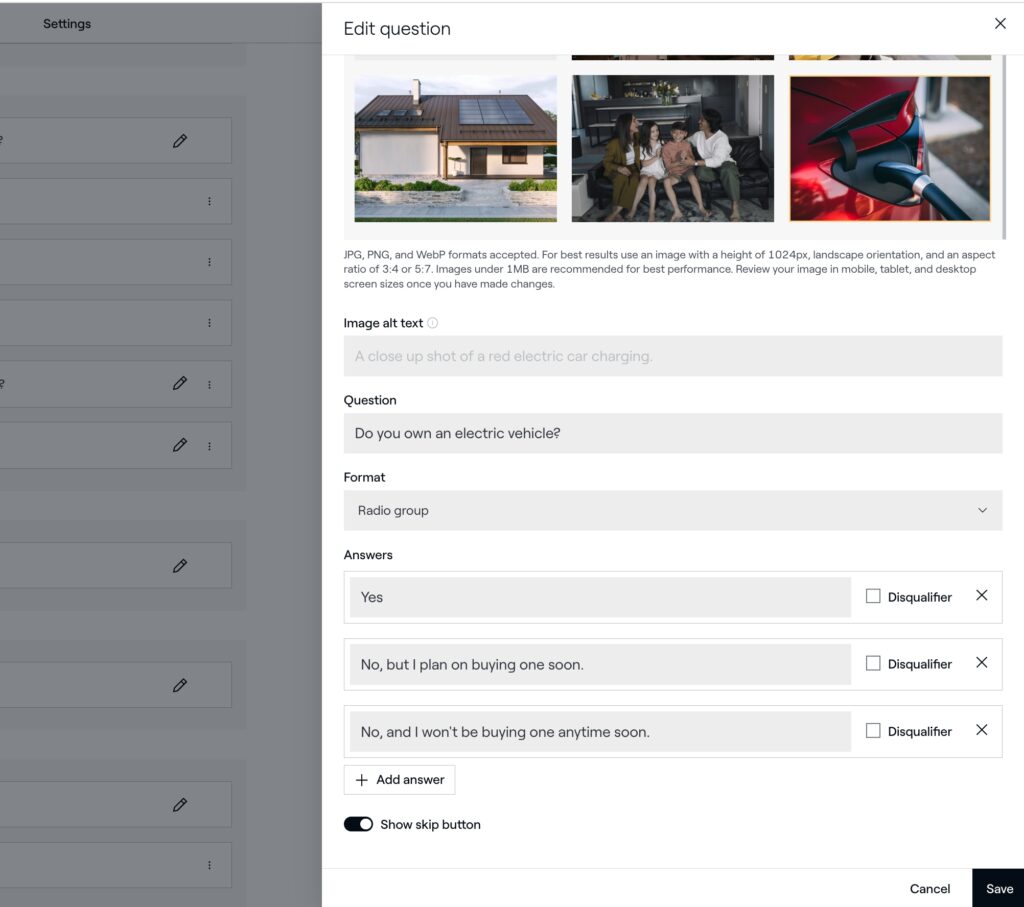
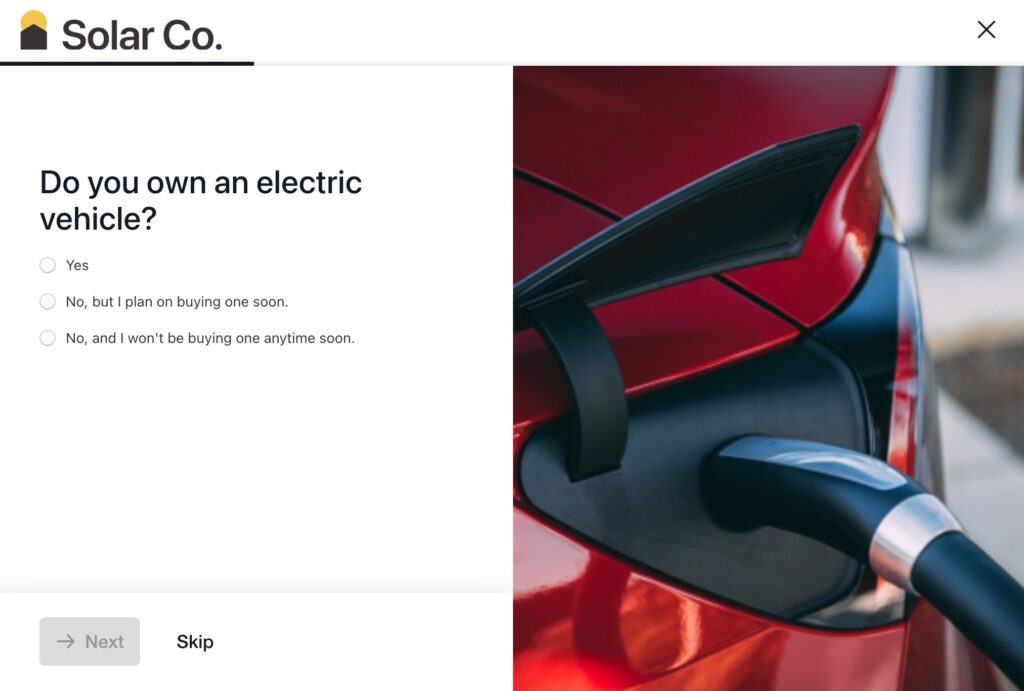
Finally, you can also create fully customized qualification questions, where you can choose the image, question, responses, and whether an answer is required. You can also choose whether each response is a “disqualifier,” which will automatically redirect a visitor to the final landing page if the response is chosen.
An example of a custom question is shown below. The first image shows how to edit the question, the second shows the result. These custom questions are where you can really make the LCAI workflow unique and gather the information that’s most relevant for your salespeople, so take the time to be creative here!
Loading page & results
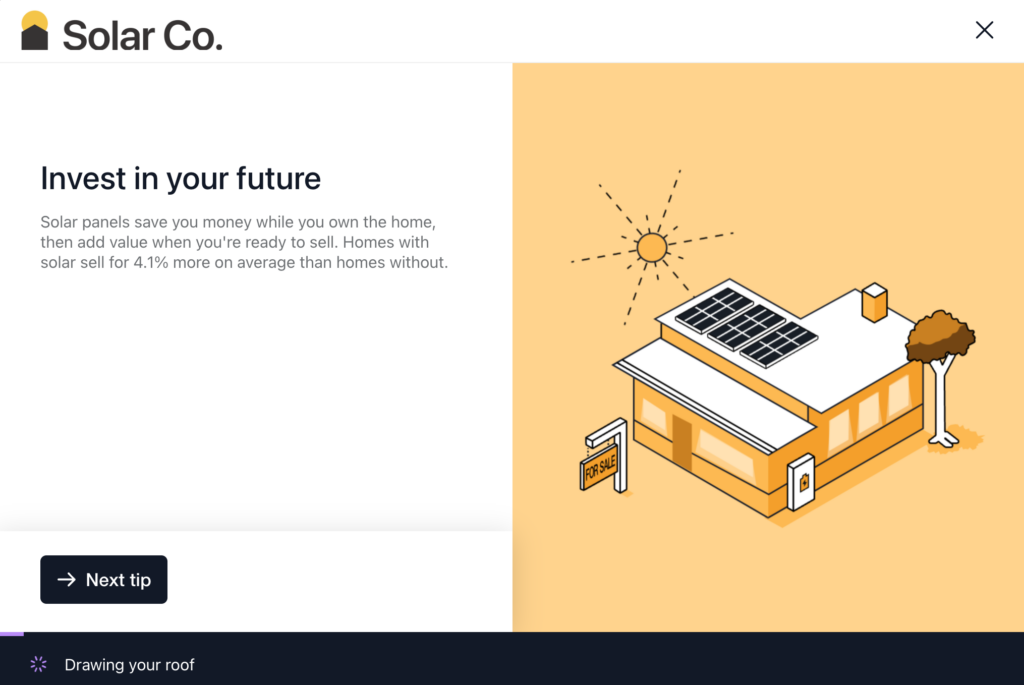
After making it through the qualification questions, visitors come to the Loading screen, where they are shown a series of tips and animations while the 3D model finishes rendering. On this page, the title and description of each tip can be customized, but the imagery currently cannot be changed
It’s worth noting that the creation of the 3D model is started in the background as soon as a visitor inputs their address and average energy bill. This means that the longer the visitor spends on the qualification questions, the shorter they will need to sit on this loading screen. Long waits on this loading screen can lead to bounces before the model is ready, so we recommend that you leave at least 2-3 qualification questions in the flow to give the 3D model some time to be created and rendered.
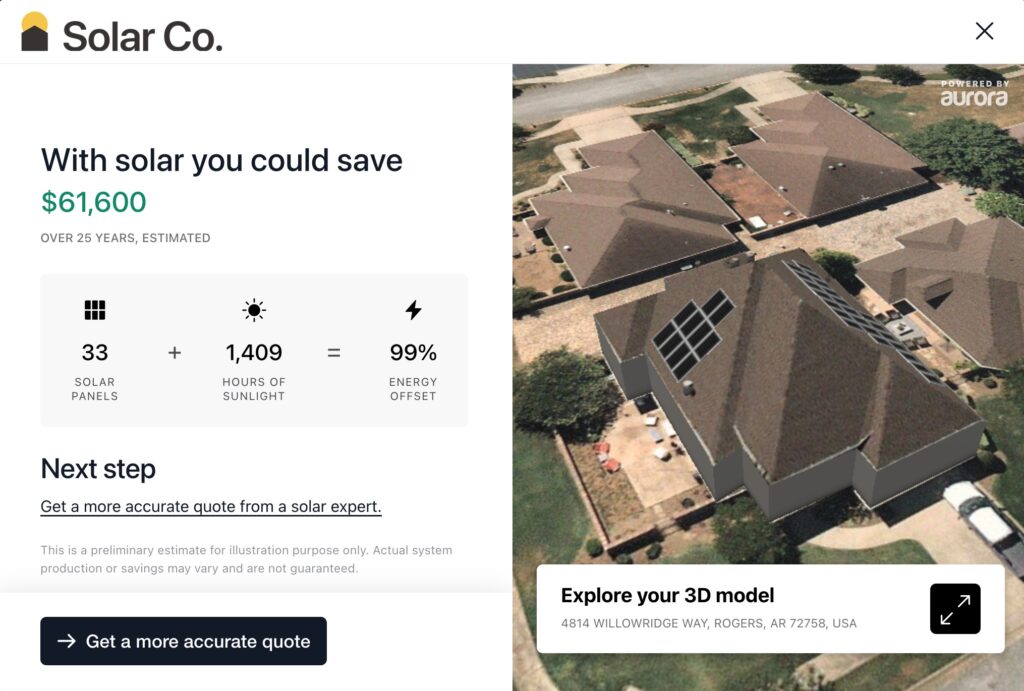
Once the 3D model and savings estimate are ready, the visitor is brought to the Results page, where they can see a savings estimate and interact with a 3D model of their home. This page is where the Solar Estimate Default settings from above make an impact. The title of the page (“With solar you could save” in the image below) and the text within the button at the bottom of the page can also be easily edited.
Intake form & utility bill capture
The intake form, which is where the visitor can submit their contact information and become a lead, can be shown either before or after the results page. If the intake form is shown before results, we refer to this as a “gated workflow.”
There are potential advantages and disadvantages to both gated and ungated LCAI workflows. Gated workflows generally lead to higher conversion rates, but can also produce lower quality leads. This is because people may put in contact information purely to see the results for their home, even if they have no intention of going solar. For ungated workflows, you may see lower conversion rates, but higher quality leads, because visitors are more likely to actually be interested in going solar if they share their contact information at this point. We recommend trying both options on your website!
Besides the location of the intake form, the image and disclaimer can also be edited to fit your brand and legal requirements.

After submitting their contact information in an ungated workflow (or after the results page in a gated workflow), leads can be prompted to upload a recent utility bill. This can be very valuable for sales teams following up with a lead because it provides accurate energy consumption data and shows what rate plan the lead is being used to bill them for electricity. This page can’t be edited, but you can hide it from the flow.

Ending the experience
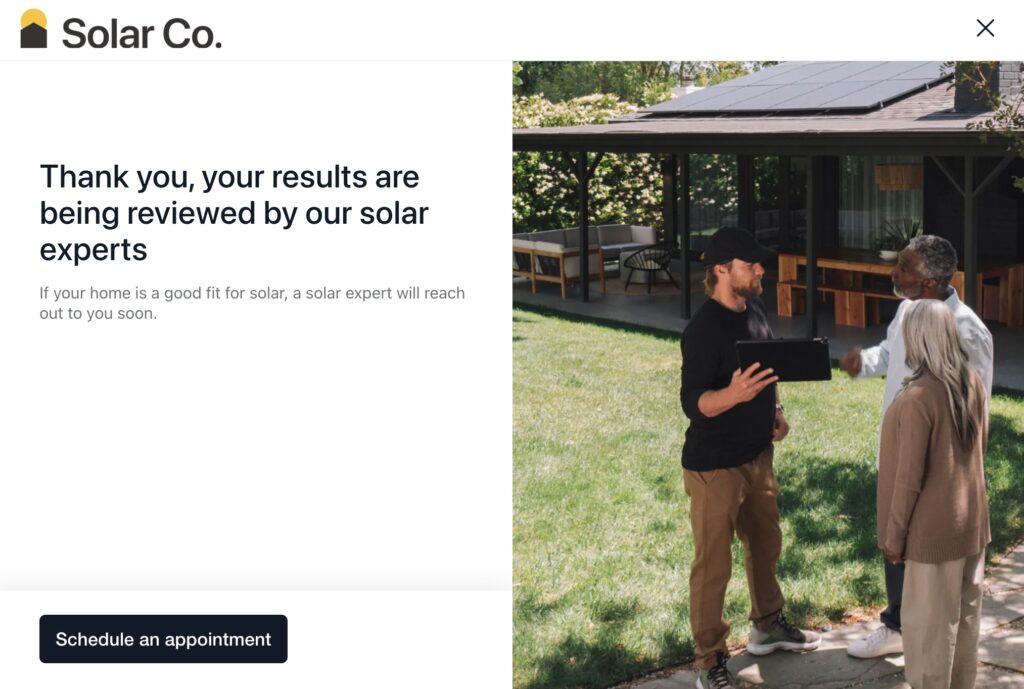
If a lead makes it all the way through the LCAI workflow, they will make it to the thank you page, shown below. On this page, the image, title, subtitle, and call to action button can be edited. Any link can also be connected to the call to action button, so you can redirect leads to another page on your website, scheduling software to schedule an appointment with your sales team, or anywhere else you would like to redirect them. For tips on what makes a powerful call to action, refer back to the first blog post in this series!
The output in Aurora
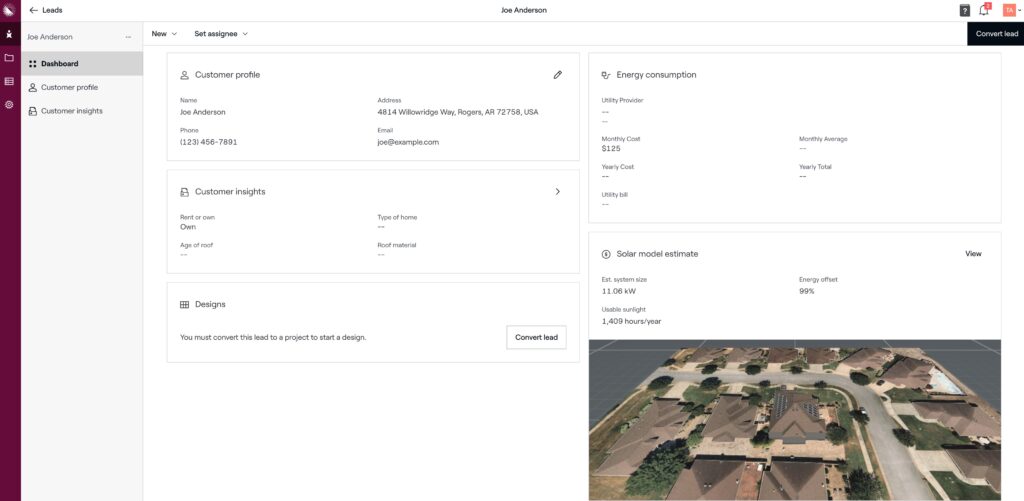
Finally, once a lead fills out the intake form, all of their contact information, along with their answers to any qualification questions, will be available in the “Leads” tab in Aurora, as shown below. From here, you can easily change the lead’s status, assign the lead to an individual Aurora user, or convert the lead directly into an Aurora project. Once a lead is converted into a project, you can use the rest of Aurora’s suite of products to design, sell, and deliver a solar system to this homeowner!
This lead information is also available via Aurora’s Leads API, which we’ll discuss in detail in the fourth blog post of this series. In the third and next post, we will look at how you can use analytics and ads to further optimize your experience with Lead Capture AI.
Have a question about Lead Capture AI that wasn’t answered here? Schedule a personalized demo, or get the info right now by clicking the chat box at the lower right of the screen.
Check out the other blogs in this series here:
- Make the leads come to you: Using calls to action to maximize clicks
- This post — Get solar leads hooked with Lead Capture AI customizations
- Get more solar leads using Lead Capture AI, analytics, and ads
- Qualify solar leads quickly and easily with Lead Capture AI and the Leads API